- Version Control
- History
- Git
- Installing Git
- Configuring Git
- Using Git
- Initializing a Repository
- Initial Commit
- Commit Messages
- Adding and Editing Files
- Deleting Files
- Renaming and Moving Files
- Undoing Changes
- Unstaging Files
- Referencing Commits
- Tagging
- Tree Listings
- Amending Commits
- The Commit Log
- Viewing Commits
- Viewing Changes With diff
- Retrieving Old Versions
- Reverting a Commit
- Undoing Commits
- Removing Untracked Files
- Stashing Changes
- Viewing and Creating Branches
- Switching Branches
- Comparing Branches
- Renaming and Deleting Branches
- Branching Strategies
- Merging Code
- Local and Remote Repositories
- Documentation
If you work with text of any kind, Git is a powerful tool you can harness to work more efficiently. Whether you are a programmer, a journalist, an novelist, or a student, working with continually changing text is a substantive part of your craft. It may be important to know what content has changed, who made the changes, when the changes were made, and to have the ability to revert back to prior forms of your work.
Git can help you with these tasks.
Note: If you are not familiar with the GNU/Linux command line interface, or you intend to use a script obtained from this site, review the Conventions page before proceeding.
Version Control
Git is Version Control System (VCS) software. It serves several purposes:
- Manage version control
- Keep track of changes, let you compare changes and move between changes
- Manage text-based content
History
In the early 2000s, development of the Linux kernel was reliant on a proprietary VCS solution called BitKeeper. When the Community version of the software had its free (as in free-of-charge) status revoked in 2005, Linux Torvalds (along with other kernel developers) decided to create their own alternative to manage the Linux kernel. Git was the result.
Git
Git is:
- Distributed VCS software
- Free/Libre Open Source software (FLOSS)
- Compatible with UNIX and UNIX-like systems, and with Windows
- Faster then many VCS alternatives
- Good at guarding against data corruption
Distributed Version Control
A distributed VCS solution, like Git, differs from a centralized VCS solution in that there is no requirement for a single, centralized, content repository. Each content creator or collaborator maintains their own repository.
That being said, there is a convention for many projects that use Git to designate a single repository as a master repository. However, this idea is not built into Git. In Git, all repositories are considered equal.
Git does not track versions. It tracks changes, and it stores these changes as change sets (i.e., patches). These change sets can be exchanged between content repositories. This is what happens when you merge in change sets or apply patches.
Git's independence from a centralized infrastructure enables you to get work done faster. No network access is required and there is no single point of failure.
Also, Git fosters participation, as any contributor can fork a project, work on it independently, and submit their change sets for inclusion or rejection in the "master" repository.
The Three Trees Architecture
Git uses a three-tree architecture that gives you granular control over the changes that get committed to a repository. Instead of directly committing your changes from your Working Directory to a Repository, you first choose the files that you want to commit and add them to a Staging Index.

Then, the changes are committed from the Staging Index to the Repository.
The Git Workflow
The Git workflow follows the Three-Trees architecture:
- You have a directory on your computer that contains your project's files. This directory serves as your Working Directory.
- When you make changes to your project's files, you add them to the Staging Index.
- From the Staging Index, you commit your changes to the Repository.
For each change set you commit, Git generates a checksum, i.e., a string of numbers and letters that ensures digital data integrity. A checksum will look something like 5wzqcknvxp6hpv7o8a55p9e2syzey2pa68235a86.
If a commit is ever changed, the checksum will change, as well. The commit and the checksum are linked. Git uses these checksums as Commit IDs. These values help Git tie your commits together into a meaningful whole.
Each commit points back to the previous commit's ID.
Branching
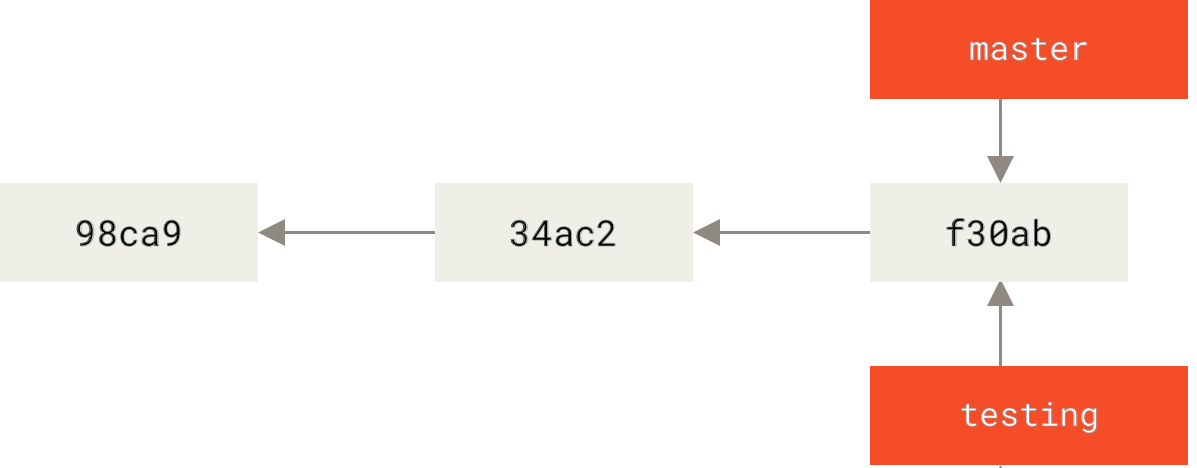
Every Git repository has a default branch, called master. As you make commits, a pointer, also called master, points to your most recent commit. If you want to try out some changes to your project, but have those changes isolated from your prior work (while still maintaining a single working directory), you can create a new branch of your project (e.g., a new branch called testing).

Creating a new branch will also create a new pointer (e.g., a new pointer called testing to match your new testing branch) that tracks your latest commits on the new branch.
The HEAD Pointer

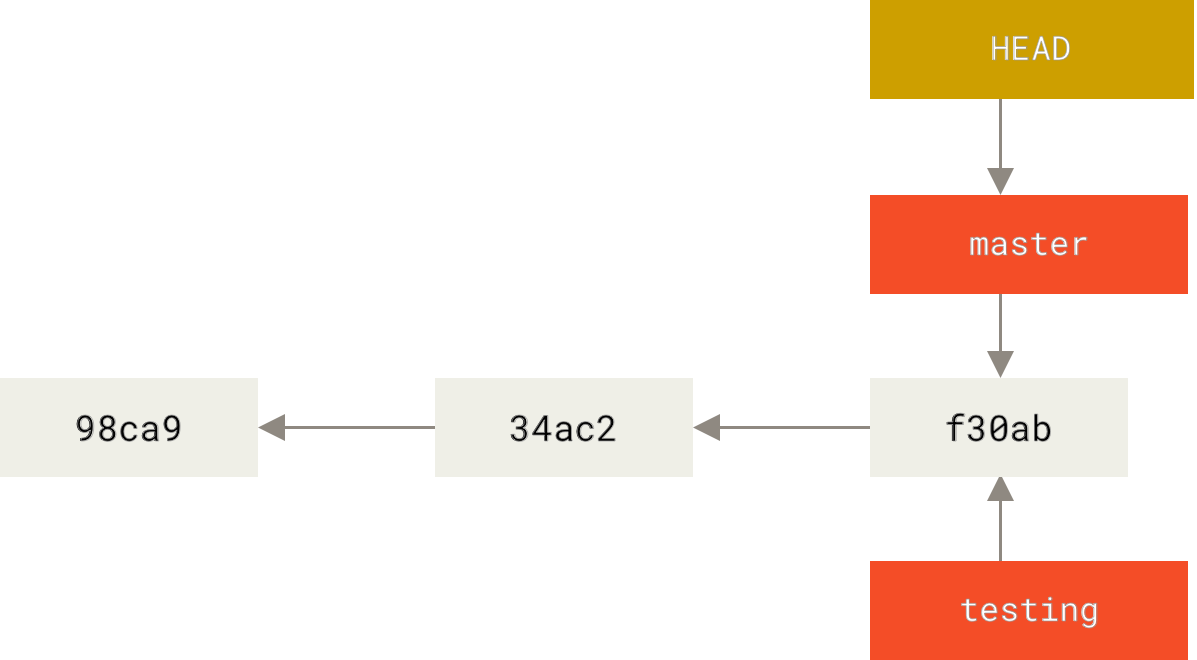
Git maintains a reference pointer that it refers to as HEAD. The HEAD pointer points to the most recent commit of the current branch in your repository. When you are on the default branch, master, the HEAD pointer tracks the master pointer.

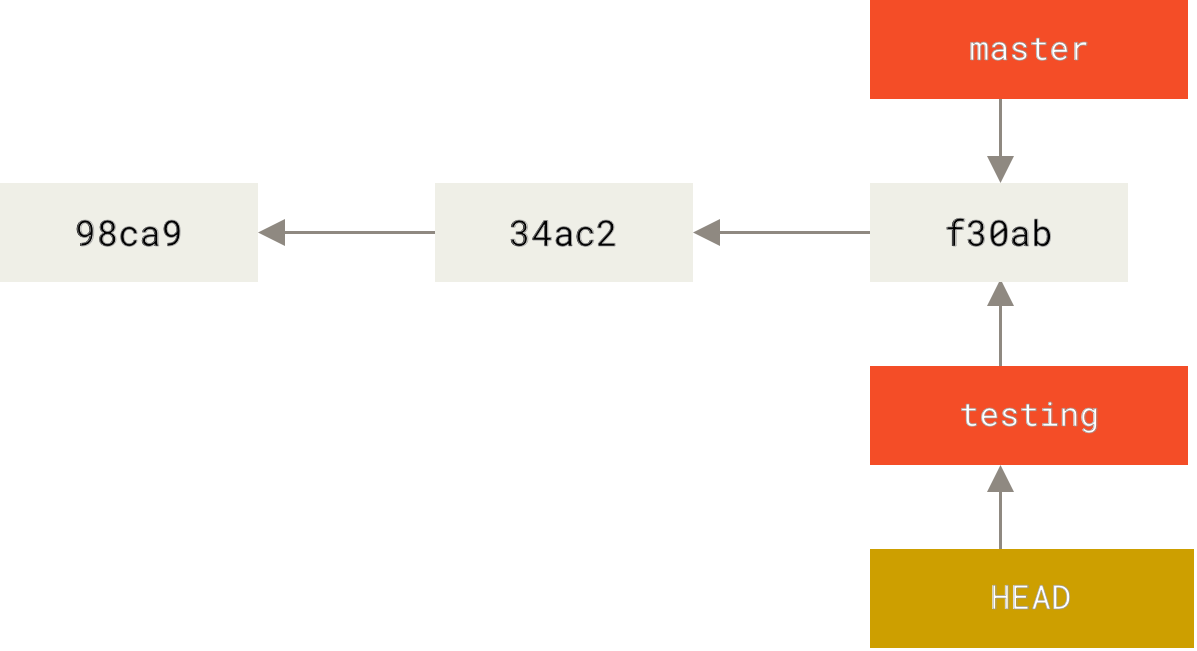
When you switch to a different branch of your project, the HEAD pointer will follow you and start tracking the pointer associated with that other branch. HEAD will also be pointing towards the tip of the currently checked out branch.
Installing Git
If you are using a GNU/Linux distribution, you might already have Git installed. You can check that by running the which git command. You can determine the version of Git that you have installed with the git --version command.
If Git is not installed on your system, you should be able to install it from your distribution's repository. For example, this command will install Git on Debian:
# apt install git
Configuring Git
Git stores configuration information in three places:
/etc/gitconfigSystem information${HOME}/.gitconfigUser-specific informationex_project/.git/configRepository-specific information
Different commands are used to configure each of these files:
git config --system- System file configuration
git config --global- User file configuration
git config- Repository file configuration
For example, you can set the name and email address to be used with all of the projects associated with your user account by running the following commands:
$ git config --global user.name ex_name \
    && git config --global user.email ex_email_address
You can verify that your commands were correctly executed using git config's list subcommand, which lists all the variables that are set in your user's Git configuration file:
git config list --global
If you only want to see the value of a single Git variable from your configuration file, you can do so by passing the name of the variable to git config:
git config --global user.email
Besides your name and email address, you will probably want to tell Git what your favorite text editor is. You can do that with the core.editor variable:
git config --global core.editor ex_editor
Color-coded output is often helpful, as well. You can enable that with the color.ui variable:
git config --global color.ui auto
After entering the above commands, your user's Git configuration file (i.e., ${HOME}/.gitconfig) should look something like this:
[user]
    email = name@example.org
    name = ex_name
[core]
    editor = ex_editor
[color]
    ui = auto
The Git configuration files contain a list of sections and variables. Sections begin with square brackets ([]) and continue until the next section begins. Variables must belong to a section.
For documentation on git config, check out the following resources:
Git Prompt
Knowing which branch you are on is helpful when working with Git at the command line. To have the branch displayed in your command line prompt, save the git-prompt.sh script to your system.
Then, in your system's ${HOME}/.bashrc file, add a line to load the git-prompt.sh script with the . command and add $(__git_ps1) to your PS1 shell variable (this is the Prompt Statement 1 variable, which you can use to define your command line prompt).
For example, if the current line defining your PS1 variable in your system's ${HOME}/.bashrc file is PS1='${debian_chroot:+($debian_chroot)}\[\033[01;32m\]\u@\h\[\033[00m\]:\[\033[01;34m\]\w\[\033[00m\]\$ ' and you saved the git-prompt.sh script to a ${HOME}/Scripts/ directory on your system, you would want to make sure your ${HOME}/.bashrc file had the following lines:
PS1='${debian_chroot:+($debian_chroot)}\[\033[01;32m\]\u@\h\[\033[00m\]:\[\033[01;34m\]\w\[\033[00m\]$(__git_ps1) \$ '

source "${HOME}/Scripts/git-prompt.sh"
To see the change reflected in your terminal, use the . command to load your ${HOME}/.bashrc file (. "${HOME}/.bashrc"), or close and re-open your terminal.
Ignoring Files
Not every file in your project needs to be tracked via Git. You can tell Git which files to ignore by creating a special file in the root of your project's directory called .gitignore. You will need to commit your .gitignore file to your repository like any other project file.
In this file, you can:
- Use regular expressions
- Negate expressions with
!(this will create a double negative, i.e., you can use this to create exceptions to files you do not actually want to ignore; e.g.,*.pywill ignore all Python scripts, but adding!test.pywill ensure that yourtest.pyscript is tracked by Git) - Ignore a directory (and its contents) with a trailing slash (e.g.,
../_static/images/) - Ignore a directory anywhere in the project directory tree with
**(e.g.,**/videos/) - Ignore the contents of a directory (but not the directory itself) with a trailing slash and an asterisk (e.g.,
../_static/podcasts/*) - Add comments by beginning a line with
#(blank lines are skipped)
If you want to add a directory to Git, but not track its contents, create a .gitignore file inside the directory with the following contents:
# Ignore everything in this directory
*
# Except this file
!.gitignore
Commonly ignored file types include:
- Compiled source code
- Packages and compressed files
- Logs and databases
- Operating system generated files
- User-uploaded assets (e.g., images, videos, etc.)
You can find a nice collection of .gitignore template files on GitHub.
If you want to have ignore rules that apply to all of your user's projects, create a ${HOME}/.gitignore_global file. Then, run the following command:
git config --global core.excludesfile "${HOME}/.gitignore_global"
This command tells Git to use your ${HOME}/.gitignore_global file as the ignore file for all of your user's projects. Any rules you add to ${HOME}/.gitignore_global will be applied to all Git repositories associated with your user account.
However, if you commit a file to a repository and then create an ignore rule for it, Git will still track changes for the file. To have Git ignore an already tracked file that you do not want to completely remove, you will need to ignore the file, and then tell Git to remove it from the staging index.
You can do this with the rm command and its --cached option:
git rm --cached ex_file_to_ignore...
After running the above command, Git will show a file deletion for ex_file_to_ignore for committing, but the file will remain in both your working directory and repository.
Tracking Empty Directories
By default, Git does not track empty directories. To do so, add a .gitkeep file to the empty directory you would like Git to track.
Using Git
After you have configured Git, customized your command line prompt, and created your ignore file(s), you are ready to start tracking changes for a project.
Initializing a Repository
A project needs to be initialized from within the project's directory. For our examples, we will use a project located at ${HOME}/Projects/ex_project/. We will navigate to the project directory (cd "${HOME}/Projects/ex_project/") and issue the following command to initialize the directory:
git init
After you issue the above command, a special directory, called .git, will be created inside of the project directory. You can view the contents of this directory with the ls command (e.g., ls -hl "${HOME}/Projects/ex_project/.git"). This is Git's workspace and is where it does the work needed for it to be your VCS solution.
| Name | Description |
|---|---|
config |
Local configuration file |
HEAD |
File that stores a reference to the current branch |
hooks/ |
Directory with script files that Git executes after events (e.g., git commit, git push) |
index |
Binary file that stores staging information |
info/ |
Directory with additional information about the repository |
logs/ |
Directory that contains changes made to refs in the repository |
objects/ |
Directory with Git's object database |
packed-refs |
File that contains packed heads and tags, which is used for efficient repository access |
refs/ |
Directory that stores information about tags and branches |
If you ever decide that you no longer want to track changes for your project and want to remove the project from Git, you only need to delete the .git directory from your project's directory. Everything that Git does is stored in this single, top-level .git directory.
Initial Commit
This is the first commit for the project, so we can skip the first step in the Git Workflow. If your project directory is your present working directory, you can add all new and untracked objects (that are not being ignored) in the entire directory tree to the staging index with:
git add .
The . above is used to represent the current working directory in the Command Line Interface (CLI).
Next, you can make your initial commit:
git commit -m 'Initial commit'
The -m 'ex_message' (--message='ex_message') option tells git commit to use the given message as the commit's message. If multiple -m options are given, they are concatenated as separate paragraphs.
If you want to create a multi-line commit message with the -m option, use only one quote (') and write the first line of your commit message. Then, when you press Enter, you will be moved to a new line and you can continue writing. When you are done, close the message with another quote and press Enter again.
If you do not use the -m option, the editor that you specified when you previously set the core.editor variable will be opened. There, you can specify your commit message.
Commit Messages
The commit message is a short comment meant to briefly describe the changes that you have made. There are best practices for constructing these messages.
Git commit messages should:
- Be short, single-line summaries (less than 50 characters)
- Be followed by a blank line and a more complete description (optional)
- Be written in the present tense
- Contain ticket tracking numbers from bugs or support requests to provide context (when applicable)
- Utilize an organizationally-derived shorthand (when applicable)
- Be clear and descriptive
Here is a helpful example from Tim Pope:
Capitalized, short (50 chars or less) summary

More detailed explanatory text, if necessary.  Wrap it to about 72
characters or so.  In some contexts, the first line is treated as the
subject of an email and the rest of the text as the body.  The blank
line separating the summary from the body is critical (unless you omit
the body entirely); tools like rebase will confuse you if you run the
two together.

Write your commit message in the imperative: "Fix bug" and not "Fixed bug"
or "Fixes bug."  This convention matches up with commit messages generated
by commands like git merge and git revert.

Further paragraphs come after blank lines.

- Bullet points are okay, too

- Typically a hyphen or asterisk is used for the bullet, followed by a
  single space, with blank lines in between, but conventions vary here

- Use a hanging indent
Adding and Editing Files
After adding or editing files in your working directory, you may want to compare the differences between your working directory, the staging index, and the repository. You can do this with the git status command. The output will show you changed files that need be committed, as well as files in the working directory that Git is not yet tracking (i.e., untracked files).
As we have previously seen, you can add all new and untracked objects (that are not being ignored) in the working directory to the staging index using the git add . command. Alternatively, if you only need to add a single file, you can just pass that file over to git add:
git add ex_file...
Then, you would commit your changes:
git commit -m 'ex_message'
Instead of separately adding and committing content, you can do both at the same time by adding the -a (--all) option to the git commit command:
git commit -am 'ex_message'
This will automatically stage changed and deleted files, but will not include new files that are not yet being tracked. Therefore, it is best to use this alternative when you are only making modifications to already tracked files.
Deleting Files
If you a delete a file in your project's working directory (e.g., rm ex_file) that has already been committed to your repository, Git will detect the change. You will need to address this by staging the change with the git rm command:
git rm ex_file...
Then, you will need to commit the change.
Alternatively, if you know that you want to delete a file from your working directory, you can do so from Git with the git rm command. This will both remove the file from your working directory and automatically stage the change for you to commit.
Directories can be removed with the -r option:
git rm -r ex_dir...
Renaming and Moving Files
When you rename a file in your working directory, Git will view the change as a deletion of the file with the old name, and an addition of a new file with the new name. You will need to remove the file with the old name with git rm and add the file with the new name with git add. Next, if you run git status, you will see that Git recognizes that a single file has actually been renamed, and you can commit the change.
Alternatively, you can use the git mv command to rename a file via Git:
git mv ex_old_file ex_new_file
This has the benefit of renaming the file for you and staging the change, which you will then need to commit.
Undoing Changes
If you want to restore a working directory file from the staging index, you can do so with the git restore command:
git restore ex_file...
If you only want to discard parts of a file, use the -p (--patch) option to interactively select hunks in the difference between the restore source and the restore location:
git restore -p ex_file...
To restore everything in your working directory with the contents of the staging index, you can run:
git restore .
Unstaging Files
You can unstage a file from the staging index from the latest commit (i.e., HEAD) with the git restore --staged command:
git restore --staged ex_file...
The above command is telling Git to point the staging index back to the version of ex_file from the last commit on the currently checked out branch, before you made your new changes (i.e., unstaging a file essentially undoes the change to the staging index that was accomplished when you added the file to the staging index with git add). This will not affect the working directory copy of your file.
To restore both the working directory and staging index from HEAD, you can do:
git restore --staged --worktree ex_file...
Referencing Commits
In Git, the term tree-ish refers to a string that references part of the commit tree.
Examples of tree-ish include:
- A full SHA-1 hash
- A short SHA-1 hash (minimum of 4 characters long; preferably 8-10 characters long to avoid ambiguity)
- The HEAD pointer
- A branch reference or tag reference
- Ancestry
In tree-ish syntax, the caret (^) is used to point to a parent commit and the tilde (~) is used to specify how many generations back you would like to reference.
Here are three examples where the tree-ish listed for each example refers to the same commit:
- parent commit
HEAD^, 5d6b43a3b0^, master^orHEAD~1, HEAD~- grandparent commit
HEAD^^, 5d6b43a3b0^^, master^^orHEAD~2- great-grandparent commit
HEAD^^^, 5d6b43a3b0^^^, master^^^orHEAD~3
Tagging
Git has the ability to tag specific points in a repository's history as being important. Typically, this functionality is used to mark release points (e.g., 0.1.0, 1.0.0).
The git tag command lists existing tags in Git, in alphabetical order. To search for a tag that matches a particular pattern, use the -l (--list) option:
git tag -l ex_pat
Git supports two types of tags:
- Lightweight - A lightweight tag is like a branch that does not change. It is just a pointer to a specific commit. Usually, these tags are meant for private or temporary object labels.
- Annotated - Annotated tags are stored as full objects in the Git database. They are checksummed, contain the tagger name/email/date, have a tagging message, and can be signed/verified with GNU Privacy Guard (GPG). These tags are meant for release.
To create a lightweight tag, provide a tag name to the git tag command:
git tag ex_tag_name
To create an annotated tag, use git tag's -a (--annotate) option:
git tag -a ex_tag_name
To view the data associated with a tag, use the git show command:
git show ex_tag_name
By default, git tag associates a tag with the latest commit. However, you can tag commits after you have moved past them, as well:
git tag -a ex_tag_name ex_commit
By default, git push does not transfer tags to remote servers. Tags need to be explicitly pushed to the server after they have been created.
git push ex_remote_alias ex_tag_name
If you have many tags that you want to push up at once, use git push's --tags option, which transfers all tags to the remote server that are not already there:
git push ex_remote_alias --tags
To only push annotated tags to the remote server, use git push's --follow-tags option:
git push ex_remote_alias --follow-tags
git tag's -d (--delete) option deletes a tag from a local repository:
git tag -d ex_tag_name
To remove a tag from a remote server, use git push's -d (--delete) option:
git push ex_remote_alias -d ex_tag_name
Tree Listings
You can see the current set of objects that Git is tracking with the git ls-tree HEAD command. In this command's output, everything you see is either a tree or a blob. A tree is a directory. A blob is a file.
If you only want to see what Git is tracking for a specific directory on a specific branch, you can do that, as well. For example, the following command shows what is being tracked for the css directory on the testing branch:
git ls-tree testing 'css/'
Amending Commits
In Git, each commit is tied to the previous commit in a continuous chain (i.e., each commit refers to the previous commit by its unique hash value). If you try to make a change to an early commit, every commit that comes after it needs to change, too.
Therefore, you can only change the latest commit. You can do so with git commit's --amend option:
git commit --amend -m 'Example commit message'
The --amend option replaces the tip of the current branch by creating a new commit. The new commit has the same parents and author as the commit it is replacing.
New changed files can be added to the last commit using the above approach, as well. Simply add them using git add prior to running your git commit --amend command.
If your work involves a remote repository and you are the only one working with the remote repository, it should be OK to use the --amend option to change the latest commit. When you push your changes to the remote repository, you will need to add the -f (--force) option to your git push command.
However, if collaborators are also using the remote repository, you are likely better off making your changes via a new commit, i.e., do not change a commit history that has already been pushed to a remote repository.
The Commit Log
You can view your project's commit log with the git log command. For each commit, you will see several lines.
commit- The unique commit ID associated with each commit (i.e., the commit's SHA-1 hash).
Author:- The author associated with the commit. This information is pulled from the author entry set in your config file.
Date:- The date and time of the commit.
The last line for each entry is the commit message associated with that commit.
You can limit the number of entries that you receive by providing the git log command a number. For example, if you only want to see the last 5 commits, you could use git log -5.
There are a variety of ways you can further filter the results of git log:
--since=- View commits made since a specific date (e.g.,
git log --since='2019-06-01'). --after=- View commits made after a specific date (e.g.,
git log --after='2019-07-01'). --until=- View commits made up till a specific date (e.g.,
git log --until='2019-08-15').
The above options allow you to use natural language, i.e., they accept values like 3 weeks ago, 2 days ago, 3.weeks, and 2.days.
--author=- View commits from a specific author (e.g.,
git log --author='Jon Stewart'). --grep=- Search for strings using the
grepcommand (e.g.,git log --grep='options').
You can view commits made between two specific commits by providing their commit IDs (e.g., git log 848o5494nq..vj7fequc8f), or see the commits made to a specific file since a specific commit (e.g., git log jsxs7f2cfb..HEAD ex_file).
You can specify a variety of formats for git log's output with the --pretty option (e.g., git log --pretty=ex_format). Here are some of the formats you can provide to --pretty:
onelineshortmediumfullfulleremailraw
Descriptions and examples of each format can be found here.
Use the -p option with git log to see a diff of what changed for each commit, or --stat --summary to view statistics about each commits' changes.
To see a graph of your commits, use git log's --graph option.
These options can be combined to provide a nice summary of your changes:
git log --all --decorate --graph --oneline
--all- Pretends that all the refs in
refs/, along withHEAD, are listed on the command line as a commit ID. --decorate- Prints out the ref names of any commits that are shown.
--oneline- Shorthand for
--pretty=oneline --abbrev-commit.
To view the commits where a specific file changed (as well as how it changed), use git log's --follow and -p (--patch) options:
git log --follow -p ex_file
Viewing Commits
Use the git show command to closely examine a commit.
git show ex_commit...
This command takes blobs, trees, tags, and commits (i.e., tree-ish) as arguments, not filenames (e.g., git show 848o5494nq).
Viewing Changes With diff
You can view differences between files in your working directory and the staging index with the git diff command (by default, the staging index is equivalent to your repository, i.e., the staging index is identical to the commit that the HEAD pointer is pointing to until you add changes to the staging index). By itself, this command displays all files that have differences between the working directory copy and the staging index copy.
If you want to see differences between a working directory copy and a staging index copy for a single file, you can add the filename to the git diff command as an argument.
Here is some example output:
$ git diff 'karamazov.txt'
diff --git a/karamazov.txt b/karamazov.txt
index e44817f..1ca56b9 100644
--- a/karamazov.txt
+++ b/karamazov.txt
@@ -5,3 +5,5 @@
 “You won't be angry?” Alyosha laughed too.

 “Well?”
+
+“That you are just as young as other young men of three and twenty, that you are just a young and fresh and nice boy, green in fact! Now, have I insulted you dreadfully?”
We will break this output down, line-by-line.
diff --git a/karamazov.txt b/karamazov.txt- This is the git diff header. The
diffreferences thediffcommand, the--gitoption means thediffcommand is in the git diff format, and thea/andb/represent the file in question. Usually, these will be the same, unless a rename or copy operation is involved. index e44817f..1ca56b9 100644- The
100644tells us about the mode of the given file (i.e., its permissions). Thee44817fand1ca56b9are the shortened hashes of the file before and after the file was changed, respectively. This line is used by thegit am --3waycommand when trying to do a 3-way merge if a patch cannot be applied by itself. --- a/karamazov.txt +++ b/karamazov.txt-
This is the two-line unified diff header.
a/represents the name of the file before the change andb/represents the name of the file after the change. @@ -5,3 +5,5 @@-5,3is the from-file-range (i.e.,-<start line>,<number of lines>) and+5,5is the to-file-range (i.e.,+<start line>,<number of lines>). Both start-line and number-of-lines refer to the position and length of the text blurb shown in the diff before and after the change, respectively. For the example above, we can see the text blurb starts at line 5 (-5and+5). Before the change, the blurb was 3 lines long (-5,3). After the change, it was 5 lines long (+5,5).“You won't be angry?” Alyosha laughed too. “Well?”-
This begins the section that describes where the files differ. Lines common to both files, like those above, begin with a Space character.
+ +“That you are just as young as other young men of three and twenty, that you are just a young and fresh and nice boy, green in fact! Now, have I insulted you dreadfully?”-
This ends the section that describes where the files differ. A
+indicates a line was added here to the first file. A-indicates a line was removed here from the first file. In the example above, you can see that two lines were added.
If you want to compare changes between files in the working directory and the repository, you can use the HEAD pointer with the git diff command:
git diff HEAD
If you only want to compare changes between files in the staging index and the repository, you can the use the --cached option with the git diff command:
git diff --cached
You can use git diff to compare your working directory to a specific commit:
git diff ex_commit_id
You can add a specific file as an argument to only compare changes for that file as it is in your working directory versus how it was at a specific commit:
git diff ex_commit_id ex_file...
Comparisons can be made between two commit IDs:
git diff ex_commit_id_1..ex_commit_id_2
You can use this syntax to compare changes from a specific commit to the last commit you made, too:
git diff ex_commit_id..HEAD
Also, the git diff command can be used with tree-ish. The following example compares a commit to the parent of another commit:
git diff 848o5494nq..vj7fequc8f^
To ignore changes to spaces, add the -b (--ignore-space-change) option to your command. To ignore all changes to white space, use the -w (--ignore-all-space) option. Add the --color-words option to highlight changed words using only colors.
Retrieving Old Versions
If you need to make a change to an earlier commit, it is best to make a new commit that undoes the earlier work. You can do this using the git restore command.
First, run git log and get the first 10 digits of the commit ID for the earlier commit in question. Then, restore the file(s) from that commit with the -s (--source) option:
git restore -s ex_commit_id --staged --worktree ex_file...
A real command will look something like this:
git restore -s 5d6b43a3b0 --staged --worktree 'readme.md'
When you use the git restore command with a specific commit's ID and use the --staged --worktree options, a copy of the file that you specify from that commit is placed into your working directory and staging index.
If you only want to restore the file(s) from a commit to the working directory, do not use the --staged --worktree options:
git restore -s ex_commit_id ex_file...
Reverting a Commit
The git revert command undoes all the changes associated with a commit by applying the necessary changes to your working directory and staging index, and creating a new commit.
git revert ex_commit_id...
An example command is:
git revert 5d6b43a3b0
After you execute the above command, your Git text editor will open and you can enter your commit message. It is considered best practice to refer to the commit ID of the reverted commit in this message.
When you close your editor, the command will automatically stage and commit your changes. If you do not want this to automatically occur, add the -n (--no-commit) option to git revert. Then, Git will only update your working directory and stage your changes, and you can manually make the commit.
The git revert command is best used for simple changes.
Undoing Commits
Like git revert, the git reset command can be used to undue prior commits. However, instead of doing so by creating a new commit, git reset does so by rewinding where the HEAD pointer points to (i.e., rewinding HEAD to a previous commit).
Different options can alter the command's behavior:
--soft- Does not change the working directory or staging index.
--mixed- Changes the staging index to match the repository (does not change the working directory). This option is equivalent to the use of the
git reset HEADcommand that was previously mentioned to unstage a file (there, we were changing the staging index copy of a file to match the copy of the file from the last commit, whichHEADreferences). When usinggit reset,--mixedis the default option andHEADis the default argument. --hard- Changes the working directory and staging index to match the repository. This is mainly used when the working directory is out of sync with the repository. Any changes to tracked files in the working directory since the commit you specify are discarded.
The --soft option is the safest, and can always be undone:
git reset --soft ex_commit_id
Removing Untracked Files
The git clean command is used to remove untracked files from the working directory. If you use the command with the -n (--dry-run) option, you can do a dry run with the command.
git clean will not remove files that have already been added to the staging index.
Stashing Changes
The stash is a place where you can temporarily store changes without having to commit them to a repository. It has several characteristics:
- It is not a part of the working directory, staging index, or repository. It is a fourth, separate location in Git.
- It does not contain commits, but something that is similar to them (i.e., a snapshot of changes that were in the process of being made). These snapshots, unlike commits, are not associated with a SHA hash.
- It is only available to you.
Usually, the stash is used when you need to save changes on your branch that you are not ready to commit to the master branch before you switch to another branch. After you run the git stash push command, Git makes your working directory and staging index match your repository.
The format for saving a change with the git stash command is:
git stash push -m 'ex_message'
You can include untracked files by adding the --include-untracked option.
Viewing Stashed Changes
You can view stashed changes with the git stash list command. Stashes are accessible even after switching branches.
You can view a diff stat for an individual item in the stash as follows:
git stash show stash@{ex_stash_index}
For example, the following command shows a diff stat for the latest item placed in the stash:
git stash show stash@{0}
The diff stat shows the difference between the stashed contents and the commit back when the stash entry was created. You can have more information displayed by adding the -p (--patch) option to git stash show.
Retrieving and Deleting Stashed Changes
Both the git stash pop and git stash apply commands pull stashed changes out of the stash and place them in the working directory. The difference is that git stash pop removes the stashed changes from the stash, while git stash apply leaves a copy there.
If the stashed item to retrieve is not in the stash when you issue your command, Git will grab the latest entry in the stash. Retrieved stash changes are merged with your current branch. As with a normal merge, this can result in conflicts.
To delete a stashed change, use the git stash drop command:
git stash drop stash@{ex_stash_index}
You can delete everything in the stash at once with the git stash clear command.
Viewing and Creating Branches
You can view all branches of your project with the git branch command. The current branch will be highlighted in green and marked with an asterisk. Also, you can determine which branch you are on by outputting the value of the HEAD pointer (e.g., cat "${HOME}/projects/testing/.git/HEAD").
To see the current branch pointers your project has, list out the contents of your project's .git/refs/heads/ directory (e.g., ls -hl "${HOME}/projects/testing/.git/refs/heads/").
To create a new branch, provide the git branch command the name of your new branch as an argument:
git branch ex_branch_name...
The default branch name for new branches can be set for the user-specific configuration using the init.defaultBranch variable:
git config --global init.defaultBranch ex_branch_name
Switching Branches
Branch switching is done with the git switch command.
git switch ex_branch_name
Use the -C option to simultaneously create and switch to a new branch.
git switch -C ex_branch_name
After using git switch, Git will automatically swap out the contents of your project's working directory and staging index to match the currently switched to branch.
Switching branches does not require a clean staging index and working tree. However, the operation is aborted if the operation leads to loss of local changes, unless told otherwise with the --discard-changes or --merge option. Also, the potentially lost local changes could first be stashed.
Comparing Branches
You can compare branches with the previously mentioned git diff command. Usually, you place the older branch first, followed by the newer branch you want to compare it to.
git diff ex_older_branch..ex_newer_branch
For example, this command compares your current master branch to your new testing branch:
git diff master..testing
To determine if the branch you are currently on contains another branch, you can use the git branch --merged command. The branch name with the asterisk is the branch that you are currently on. Any branches listed above it are contained within the current branch (i.e., merged).
Renaming and Deleting Branches
Rename a branch by adding the -m (--move) option to the git branch command.
git branch -m ex_branch_name ex_new_branch_name
Your branches should have good, descriptive names.
Delete a branch by adding the -d (--delete) option to the git branch command.
git branch -d ex_branch...
You cannot delete a branch that you currently have checked out. Also, if you try to delete a branch that has changes that are not merged into your current branch, Git will notify you, and you will need to swap out the -d option for the -D ( --delete --force) option to continue with your command.
Branching Strategies
Long-Running Branches
Many Git developers have a workflow that has stable code in a main branch (possibly only code that has been or will be released), and other parallel branches (e.g., develop, next, proposed) that they work from or use to test stability. When a parallel branch becomes stable, it is merged into main.
The idea is that different branches are at different levels of stability. When a branch reaches a more stable level, it is merged into the stabler branch above it. Having multiple long-running branches like this is not required, but may be helpful with large or complex projects.
Topic Branches
Topic branches may be useful in projects of any size. A topic branch is a short-lived branch that is created and used for a single feature or related work. In Git, it is common to create, work on, merge, and delete branches several times a day.
This technique allows you to context-switch quickly and completely. Since your work is separated into silos where all the changes in that branch have to do with that topic, it is easier to see what has happened during code reviews. You can keep the changes there and merge them in when they are ready, regardless of the order in which they were created or worked on.
Opinionated Branching Strategies
-
Git Flow - Isolate work into five different types of branches.
maindevelopfeaturereleasehotfix
mainanddevelopare the two primary branches. Each supporting branch (feature,release,hotfix) has a different intended purpose. -
GitHub Flow - The
mainbranch contains production-ready code. Feature branches contain work on new features and bug fixes, and are merged back into themainbranch when the work is finished and properly reviewed.There are six principles that should be adhered to:
- Any code in the
mainbranch should be deployable. - Create new descriptively-named branches off the main branch for new work.
- Commit new work to your local branches and regularly push work to the remote.
- To request feedback or help, or when you think your work is ready to merge into the
mainbranch, open a pull request. - After your work or feature has been reviewed and approved, it can be merged into the
mainbranch. - Once your work has been merged into the
mainbranch, it should be immediately deployed.
- Any code in the
-
GitLab Flow - A
mainbranch contains code that is ready to be deployed. However, this code is not the source of truth for releases. In GitLab Flow, thefeaturebranch contains work for new features and bug fixes that will be merged back into themainbranch when they are finished, reviewed, and approved.The GitLab Flow branching strategy works with two different types of release cycles:
- Versioned Release - Each release has an associated
releasebranch that is based off themainbranch. Bug fixes should be merged into themainbranch first, before being cherry-picked into thereleasebranch. - Continuous Release - Production branches are utilized to contain deployment-ready code, so code is merged into the
productionbranch when it is ready to be released.
- Versioned Release - Each release has an associated
Merging Code
To merge changes from another branch into your currently checked out branch, use the git merge command.
git merge ex_branch_to_merge...
Git has a default commit message for merges, so you do not need to provide one if you do not want to.
Always run the git merge command with a clean working directory.
Fast-Forward Merge
A fast-forward merge is done when the HEAD pointer of the currently checked out branch is pointing at the commit where the new branch was made. This kind of merge moves the branched commit up to the main branch, and moves the HEAD pointer of the currently checked out branch to the latest commit (i.e., the HEAD pointer is fast-forwarded to the latest commit). By default, a fast-forward merge does not generate a merge commit.

master is fast-forwarded to hotfix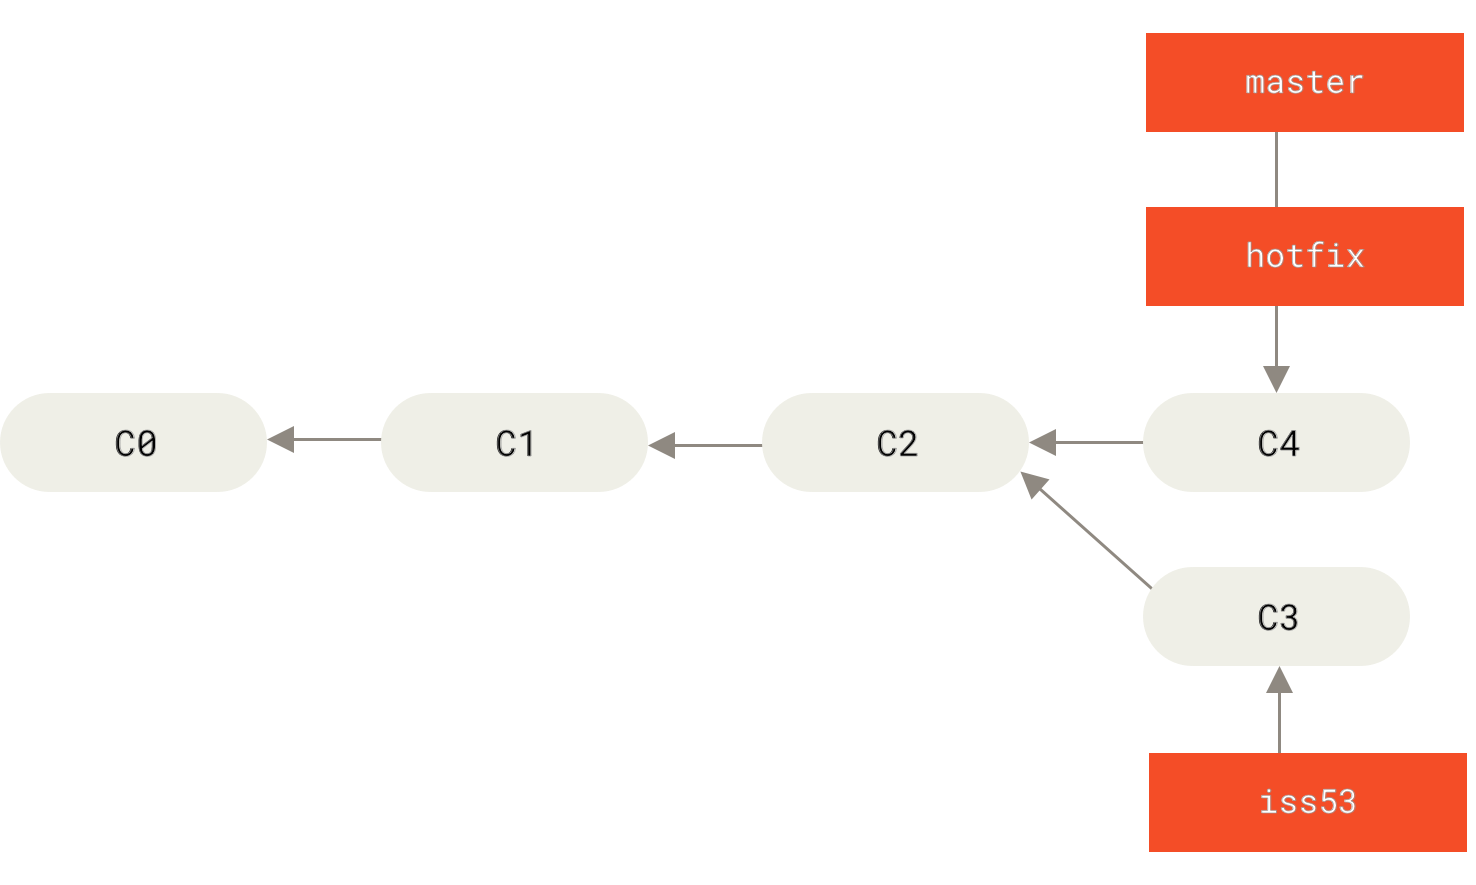
These are germane fast-forward merge options:
--no-ff- This option forces Git to create a merge commit. This is useful if you want documentation of your merge.
--ff-only- This option prevents Git from performing a merge, unless
HEADis already up-to-date or the merge can be resolved as a fast-forward merge.
In general, git merge uses a recursive merge strategy:
This can only resolve two heads using a 3-way merge algorithm. When there is more than one common ancestor that can be used for 3-way merge, it creates a merged tree of the common ancestors and uses that as the reference tree for the 3-way merge. This has been reported to result in fewer merge conflicts without causing mismerges by tests done on actual merge commits taken from Linux 2.6 kernel development history. Additionally this can detect and handle merges involving renames, but currently cannot make use of detected copies. This is the default merge strategy when pulling or merging one branch.
Merging Conflicts
A conflict occurs when there are two changes to the same line(s) of content in two different commits.
There are three ways to deal with merge conflicts:
- Abort the merge (i.e., run the
git merge --abortcommand) - Manually resolve the conflict
- Use a merge tool
To manually resolve a merge conflict, you will need to:
- Open up the file(s) that contain conflicting content.
- Find the line(s) where the problem lies.
- Manually fix each conflict.
- Repeat the above steps for all other files that contain conflicting content.
- Add the adjusted files to the staging index.
- Commit your changes.
The following points will help you reduce the occurrence of merge conflicts:
- Keep your content's lines short.
- Use small and focused commits.
- Beware stray edits to white space (e.g., spaces, tabs, line returns).
- Merge often.
- Track changes to master when working on a non-master branch (i.e., as changes occur to master, merge them back into the branch you are working on; this is referred to as tracking).
Merge conflicts can happen when the following integration commands are used:
git mergegit rebasegit cherry-pickgit pullgit stash apply
If you just want to undue a failed merge/rebase, you can enter:
git merge --abortgit rebase --abort
Merge Versus Rebase
Often, a fast-forward merge is not possible because both branches have commits after the common ancestor commit. Therefore, Git must create a merge commit, i.e., a commit that contains differences between the two branches since the common ancestor commit.
The merge commit is not like other commits. It does not contain a set of related changes. Its purpose is to connect two branches.
If you want a cleaner, simpler history for your project, you may want to avoid merges and merge commits. This is what a rebase is for.
git rebase ex_branch_to_integrate
To perform a rebase, Git:
- Temporarily removes all commits on the first branch that came after the common ancestor commit.
- Commits all the commits after the common ancestor commit from the branch to be integrated to the first branch.
- Reintegrates the temporarily removed commits from the first branch into the first branch, i.e., rebase them.
Rebasing rewrites a project's history, as you are changing the parentage of a commit.
Do not change a commit history that has already been pushed to a remote repository.
git rebase should only be used for cleaning up your local commit history before merging it into a shared team branch.
Local and Remote Repositories
A remote repository is a central clearinghouse for changes that are occurring.
Cloning a Remote Repository
You can clone a remote repository to a local directory on your computer with the git clone command. First, navigate to the directory that you want to contain the remote repository directory. Then, run the following command:
git clone ex_remote_url ex_local_directory
Here, ex_local_directory will be the name for the directory that the remote repository will be cloned into. If you do not specify this value, the humanish part of the remote repository name will be used.
When you create a clone of a remote repository, Git creates remote-tracking branches for each branch in the cloned repository, and creates and checks out an initial branch that is forked from the cloned repository's currently active branch.
You can view remote information in your project's .git/config file (you can use this file to see whether a branch is a tracking or non-tracking branch, as well).
The git clone command can also be used to create a mirror of a remote repository with the --mirror option:
git clone --mirror ex_remote_url
--mirror is similar to the --bare option, in that it maps local branches of the source to local branches of the target, but it also maps all refs and sets up a refspec configuration, such that all these refs are overwritten by a git remote update in the target repository.
Manually Adding a Remote Repository
Navigate to your project's working directory via the command line interface. To add a remote for your project, use the git remote add command, with an alias and URL for the remote repository. By convention, the primary remote repository is called origin. However, you can call it whatever makes the most sense for your project.
git remote add ex_remote_alias ex_remote_url
To remove a remote, use the git remote remove command with an alias name:
git remote remove ex_remote_alias
You can use the git remote command to view all remote repositories that Git is aware of (add the -v (--verbose) option for more information).
Working With Remote Repositories
To pull down changes from a remote master branch, you can use the git fetch command, which pulls down changes from the remote origin's master branch into your local origin/master branch (essentially, origin/master is a synced cached copy of a remote repository branch that Git takes care of for you):
git fetch ex_remote_alias
For example:
git fetch origin
If your project only has one remote repository, you do not need to specify the git remote server, and can just use git fetch to fetch the latest changes, as the default remote origin will be used.
When Git does a fetch and synchronizes with the remote repository branch, it downloads any Git objects you do not have locally, and pulls down bookmarks that reference the tips of each of the branches that are on the remote repository. Fetching should be frequently done.
The changes that are pulled down into your local origin/master branch are not merged into your local master branch until you use the git merge command:
git merge origin/master
The above command merges your local origin/master branch into your local master branch. Always do a fetch before you do a merge.
Generally, when working with a remote server, your Git process will look like this:
- Do your commits locally.
- Fetch the latest changes from the remote server, which synchronizes your origin/master branch with the remote master branch.
- Merge your origin/master branch with your local master branch.
- Push the changes from your local master branch to the remote server.
The git pull command combines the git fetch and git merge commands.
You can push a local master branch to a git remote server with the git push command:
git push ex_remote_alias ex_local_branch:ex_remote_branch
For example:
git push origin master:master
The above command pushes your local master branch to a remote master branch on a git remote server called origin (if the remote master branch does not exist, it will be created). If you do not specify the git remote server, git push defaults to origin. If you do not specify the branch to push, the current branch is pushed to the corresponding remote branch. So, in many cases, the above command can be shortened to git push.
If you are trying to push a local non-tracking master branch to a remote server, add the -u (--set-upstream) option:
git push -u origin master:master
The -u option creates a new local branch called origin/master, which references and tracks the remote master branch. When you clone a remote repository, this is automatically done for you.
If you also want this automatically done when pushing a local non-tracking branch to a remote server, set push.autoSetupRemote to true in your user's Git configuration:
git config --global push.autoSetupRemote true
If you do not want this automatically done and are dealing with a local branch that is not tracking a remote branch, but you want it to, you have three options:
- Add the branch to your project's
.git/configfile. - Use the
git config branchcommand (e.g.,git config branch.ex_non_tracking_branch.remote originandgit config branch.ex_non_tracking_branch.merge refs/heads/master). These commands set the required configurations in your project's.git/configfile. - Use the
git branch -ucommand (e.g.,git branch -u ex_non_tracking_branch origin/master;-uis short for--set-upstream-to=ex_upstream_branch). This command tells Git which remote to track for the non-tracking branch.
Git does not perform a merge when you use the git push command. So, you need to fetch changes from your remote branch and locally address any conflicts before you push your changes to an updated remote branch.
Viewing Remote Branches
Previously, we discussed using the git branch command to view your project's local branches. You can add the -r (--remotes) option to this command to view your remote branches:
git branch -r
To view all branches, both local and remote, use the -a (--all) option:
git branch -a
Switching to Remote Branches
Unlike local branches, remote branches cannot be directly switched to. Instead, you need to create a local branch from a remote branch and work locally with that.
git switch -C ex_local_branch ex_remote_alias/ex_remote_branch
Deleting a Remote Branch
You can delete a remote branch with the git push command:
git push ex_remote_alias :ex_remote_branch
An actual push involves specifying a local branch that you want to push to a remote branch before the : (e.g., git push origin master:master). So, the above command is essentially telling Git to push nothing up to the remote branch, which deletes it.
Documentation
To see a list of commonly used Git commands, use the git help command. If you want the manual page for a specific Git command, append its name to the git help command (e.g., git help log).
Git's official online documentation can be found here. Other useful resources are linked to there, as well:
If you use DuckDuckGo as your browser's search engine, you can view a handy Git reference by searching for git cheat sheet, or search the official Git documentation by typing !gitdocs ex_term.